Ubuntu 15.04 Vivid is another exciting
release for Ubuntu users, new stuff added and some things changed like
systemd replaced upstart. Ubuntu team is heading towards great way and
has done really great work, unlike previous releases this release got
some new features and improvements. Unity 8 is not replaced yet but
still Unity 7.3 is much faster, responsive and many other things for
release info checkout this post.
Every time when new Ubuntu version arrives I dive into and see what
tweaks can be done to make users experience much more better, I am not
trying to say Ubuntu isn't perfect 'for sure it is' but there are some
other things to be done after fresh install and make it much better than
any other OS available out there. All tweaks are tested by NoobsLab, so
hopefully you won't get any problem with them and if you encounter any
problem feel free to ask. Lets start .....
1: Enable one-click to minimize feature:
Minimize
on click had landed in Ubuntu 14.10 Utopic/14.04 Trusty and it is
disabled by default, it is still unsupported in Ubuntu 15.04 but you can
enable it from compiz manager.
To install CCSM enter following command in Terminal:
Go to Dash and Search "CCSM" > Then go to Unity plugin > Tick 'Minimize Single Window Applications' feature
2: Disable online searches from dash:
If you don't like online searches in Unity Dash, simply you can disable it by going into Settings -> Privacy then Turn off online search.
3: Install Drivers via Additional Drivers:
If
you want to get better experience from Ubuntu then always install
recommended drivers. You can choose best drivers available for your
hardware via "Additional Driver" and can be install/uninstall easily.
Open Dash and Search for "Software & Updates" or "Additional Drivers" open it and navigate to Additional Drivers "Tab".
3: Tweak Tools:
Gnome Tweak Tool
is well-known powerful tweak tool, With this tool you can manage your
Ubuntu environment like: Change theme, icons, fonts, cursor and so on
options. Unity Tweak Tool is a configuration tool for the Unity Desktop,
providing users access to features and configuration options, and brings
them all together in a polished & easy-to-use interface.
This
time recursive search is disabled by default in Ubuntu. If you like
that feature you can enable/disable with simple two commands.
Recursive search
To enable recursive search for Nautilus, enter following command in Terminal:
Terminal Command:
gsettings set org.gnome.nautilus.preferences enable-interactive-search false
Type-ahead Search
To disable recursive search (Enable Type-ahead search) for Nautilus, enter following command in Terminal:
Terminal Command:
gsettings set org.gnome.nautilus.preferences enable-interactive-search true
7: Show username on panel:
By default current logged-in username doesn't show on panel, so you can enable it easily.
Enter following command in terminal:
Terminal Command:
gsettings set com.canonical.indicator.session show-real-name-on-panel true
To remove name from panel, Enter following command:
Terminal Command:
gsettings set com.canonical.indicator.session show-real-name-on-panel false
8: Enable Locally Integrated Menus & Scale Title + Menus:
LIM (Locally Integrated Menus)
Local Integrated Menus display on the Title bar of any un-maximized
Window. By default it is disabled, if you like it you can enable it
easily. Go to System Settings > Appearance > Behavior > under
'Show the menus for a window' > select "In the window's title bar"
Scale Title bars & Menu
A new feature added to Unity, now you can increase/decrease size of
Menus & Title bars easily. Go to System Settings > Displays >
under 'Scale for menu and title bars' > adjust as per your needs
10: Install Gimp Image Editor:
GIMP
is the GNU Image Manipulation Program. It is a freely distributed piece
of software for such tasks as photo retouching, image composition and
image authoring.
Enter following command in terminal to install gimp:
Linux
don't need Anti-virus but Firewall is important for any kind of
Operating System. UFW is installed by default in Ubuntu but it is
command line and disabled by default. You can install best firewall GUFW
enable and manage it graphically.
Enter following command in terminal to install firewall:
Terminal Command:
sudo apt-get install gufw
After installation open Dash and Search "GUFW" to configure it.
11: Install Adobe Flash Plugin:
Flash player isn't available by default , So you can install flash player easily from Ubuntu repositories.
Open Terminal and enter following commands:
Terminal Command:
sudo apt-get install flashplugin-installer
Alternatively: install Adobe flash from canonical partner repository, open Software-Sources > Tab 'Other Software' and tick 'Canonical Partners'
Now enter these to commands to update and install adobe flash:
Terminal Command:
sudo apt-get update
sudo apt-get install adobe-flashplugin
Also install Silverlight alternative Pipelight for Web browsers.
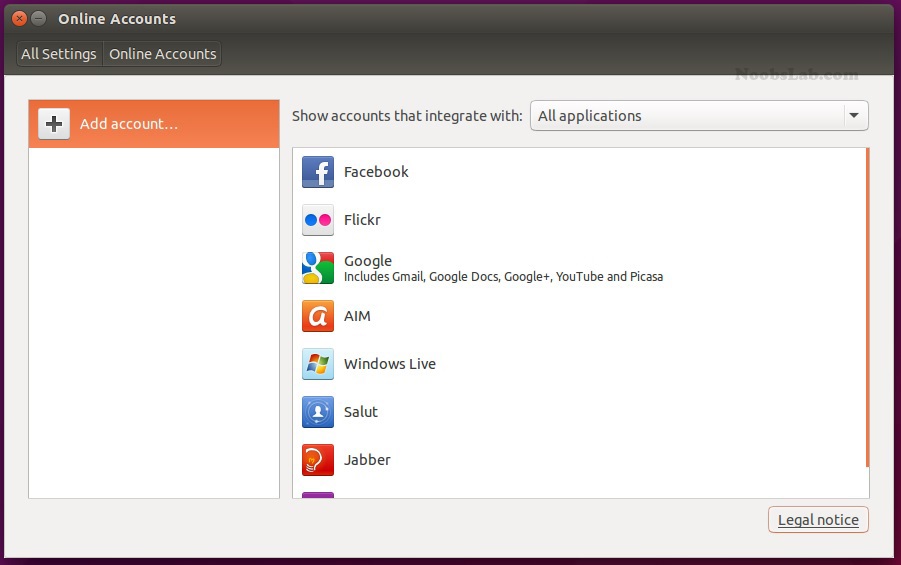
12: Integrate online accounts in Ubuntu
Ubuntu
has Facebook, Google, Twitter, Yahoo, Hotmail and other accounts
support. It offers you different features of your online account within
Ubuntu desktop. Go to Settings > Online Accounts and configure accounts.
13: Install Restricted Extras:
There
are some Restricted extras available in Ubuntu repositories which can't
be install while installation but you can install these Restricted
extras by yourself. Restricted extras contains: mp3 playback and
decoding, support for various formats, fonts, java, flash plugin, lame,
dvd playback.
Terminal Command:
sudo apt-get install ubuntu-restricted-extras
14: Codecs and Enable DVD Playback:
If
you are multimedia user and use Ubuntu for multimedia then these codecs
are very useful for you. You can install them by single command.
You can compress and decompress 7z, zip, gzip, rar, xz, tar, bz2, xar, tar.gz, tar.bz, and many others.
Enter following command in terminal to install:
If
you are experiencing something crashes in your Ubuntu, and you don't
like to be notify with reports. You can disable them easily.
Enter following commands to disable crash reports:
Terminal Command:
sudo gedit /etc/default/apport
Now text file will open, In the last line you will see "enabled=1" change it to "enabled=0". Save and close file.
Now enter following command in terminal to stop apport service:
Terminal Command:
sudo service apport stop
19: To Reset Unity:
If something went wrong you can reset Unity desktop with following commands.
Fedora
22 Workstation and NVidia Linux Driver install (GTX 980 card in my
case)(Allows full resolution and quiets down the NVidia fans in
Linux)
==================================================
===========================================
Info:
Fedora 22
version installed: Fedora-Live-Workstation-x86_64-22-3.iso
NVidia
Linux x86_64 driver installed: Current (2015-0619) driver used:
NVIDIA-Linux-x86_64-352.21.run
Download the NVidia "Linux
x86_64/AMD64/EM64T" driver listed above here:
http://www.nvidia.com/object/unix.html
Install
the pre-requisites:
---------------------------
dnf install
dkms gcc kernel-devel kernel-headers
Blacklist and remove
the default nouveau graphics
driver:
---------------------------------------------------------
echo
"blacklist nouveau" >>
/etc/modprobe.d/blacklist.conf
add "rd.driver.blacklist=nouveau"
to middle of "GRUB_CMDLINE_LINUX=" line in
/etc/sysconfig/grub
Example:
GRUB_CMDLINE_LINUX="rd.lvm.lv=fedora/swap
rd.lvm.lv=fedora/root rd.driver.blacklist=nouveau rhgb
quiet"
Remove default nouveau
driver:
------------------------------
dnf remove
xorg-x11-drv-nouveau
Set computer to boot to run level 3
(non-graphical boot) and
reboot:
--------------------------------------------------------------------
systemctl
set-default multi-user.target
reboot
Install the
NVidia driver:
----------------------------
chmod +x
NVIDIA-Linux-x86_64-352.21.run
sh
./NVIDIA-Linux-x86_64-352.21.run
accept license
allow dkms
module updates with new kernel updates
install 32bit
compatibility
allow it to update your xorg.cfg file
If
successful, then:
--------------------
Set computer to boot
to run level 5 (graphical boot) and
reboot:
----------------------------------------------------------------
systemctl
set-default graphical.target
reboot
The
information at the below web link by "Duke Nukem" was
helpful in getting the above to work for Fedora 21 +
22:
==================================================
=========================
"Step by step instructions:
Fedora 20, NVIDIA
GPU" http://setiathome.berkeley.edu/forum...d.php?id=74094
KERNEL
UPDATES:
===============
NOTE: When updating kernels, the
dkms package should technically re-enable the NVidia driver
automatically.
If not, you can update the driver manually as
listed below.
KERNEL UPDATES & manual NVidia driver
update:
---------------------------------------------
If
you update your kernel, then the new kernel will not by default have
the NVIDIA driver enabled (Note: only if you do not have dkms
installed).
You can reinstall the NVIDIA driver after updating
your kernel and rebooting by doing the following:
Ctrl + Alt +
F2 (this will get you a login)
Login as root
sh
./NVIDIA-Linux-x86_64-352.21.run
Accept license
Continue
Installation
Yes to Install NVIDIA's 32-bit compatibility
Yes
to update your x configuration file (may not be needed if
upgrading)
reboot
Note: If a recent kernel update
removes the blacklist file, you may have to do this again and then
reboot and then do the above update section after a kernel
update:
Blacklist and remove the default nouveau graphics
driver:
---------------------------------------------------------
echo
"blacklist nouveau" >>
/etc/modprobe.d/blacklist.conf
add "rd.driver.blacklist=nouveau"
to middle of "GRUB_CMDLINE_LINUX=" line in
/etc/sysconfig/grub
Example:
GRUB_CMDLINE_LINUX="rd.lvm.lv=fedora/swap
rd.lvm.lv=fedora/root rd.driver.blacklist=nouveau rhgb
quiet"
Remove default nouveau
driver:
------------------------------
dnf remove
xorg-x11-drv-nouveau
2015-0619
Update:
-----------------
Current kernel and old NVidia
driver would fail to get into X-window session. Upgrading the NVidia
driver fixed this for me. This is how I fixed this:
At
failed window, press Ctrl + Alt + F2 and login as root
Transfer
the latest driver to your PC from another PC (I used
NVIDIA-Linux-x86_64-352.21.run)
Note, if you need to
enable SSH so you can transfer the new driver over (via scp or sftp)
to your PC, run this to enable SSH and scp/sftp transfers:
systemctl
enable sshd.service
systemctl start sshd.service
Then
use some scp or sftp transfer program to copy the NVidia driver over
to your non-working Fedora server. (I use FileZilla client with sftp
transfer).
Set computer to boot to run level 3
(non-graphical boot) and
reboot:
--------------------------------------------------------------------
systemctl
set-default multi-user.target
reboot
Install the
NVidia driver:
--------------------------
chmod +x
NVIDIA-Linux-x86_64-352.21.run
sh
./NVIDIA-Linux-x86_64-352.21.run
accept license
allow dkms
module updates with new kernel updates
install 32bit
compatibility
allow it to update your xorg.cfg file
If
successful, then:
--------------------
Set computer to boot
to run level 5 (graphical boot) and
reboot:
----------------------------------------------------------------
systemctl
set-default graphical.target
reboot
Openbox is a lightweight, powerful, and highly configurable stackingwindow manager with extensive standards support. It may be built upon and run independently as the basis of a unique desktop environment, or within other integrated desktop environments such as KDE and Xfce, as an alternative to the window managers they provide. The LXDE desktop environment is itself built around Openbox.
A comprehensive list of features are documented at the official Openbox website. This article pertains to specifically installing Openbox under Arch Linux.
display managers will automatically detect Openbox, allowing for it to be run as a standalone session.
When using Xinitrc or SLiM, add the following line:
exec openbox-session
Note: Specifying openbox instead of openbox-session will prevent autostart in /etc/xdg/autostart.
Other desktop environments
When replacing the native window manager of a desktop environment with Openbox, keep in mind that Openbox does not provide any compositing effects (such as transparency). See #Compositing effects.
GNOME
GNOME Shell is a plugin for the mutter window manager, so can not be used with Openbox. Openbox does work with GNOME applications (but see GTK+#Client-side decorations). [1]
Note: Local configuration files will always override global equivalents.
Four key files form the basis of the openbox configuration, each serving a unique role. They are: rc.xml, menu.xml, autostart, and environment. Although these files are discussed in more detail below, to start configuring Openbox, it will first be necessary to create a local Openbox profile (i.e for your specific user account) based on them. This can be done by copying them from the global/etc/xdg/openbox profile (applicable to any and all users) as a template:
$ cp -R /etc/xdg/openbox ~/.config/openbox
rc.xml
Tip: Custom keyboard shortcuts (keybindings) must be added to the <keyboard> section of this file, and underneath the <!-- Keybindings for running aplications --> heading.
~/.config/openbox/rc.xml is the main configuration file, responsible for determining the behaviour and settings of the overall session, including:
Keyboard shortcuts (e.g. starting applications; controlling the volume)
Theming
Desktop and Virtual desktop settings, and
Application Window settings
This file is also pre-configured, meaning that it will only be necessary to amend existing content in order to customise behaviour to suit personal preference.
menu.xml
~/.config/openbox/menu.xml defines the type and behaviour of the desktop menu, accessable by right-clicking the background. Although the default provided is a static menu (meaning that it will not automatically update when new applications are installed), it is possible to employ the use ofdynamic menus that will automatically update as well.
The available options are discussed extensively below in the Menus section.
autostart
The file ~/.config/openbox/autostart, if present, is executed by Openbox at startup. A basic example of this file consists of one command per line, like so:
xset -b
nm-applet &
conky &
Note that a single ampersand (&) causes the process in question to be run in the background, allowing the script to continue on to the next command. An ampersand is therefore needed after each command that launches a process of indefinite duration. Commands that are completed essentially instantly (e.g. xset -b) may be left alone.
Issues regarding commands in ~/.config/openbox/autostart being executed out of order (or skipped altogether) are often resolved by the addition of small delays. For instance:
Note: In addition to running ~/.config/openbox/autostart, Openbox will also launch programs with .desktop files present in /etc/xdg/autostart. This is the global autostart directory, which is automatically sourced by XDG-compliant desktop environments (e.g. GNOME, KDE). Openbox will source this directory as well, provided that the package python2-xdg is installed, and Openbox is launched as openbox-session (rather than simply openbox, as noted earlier). Duplication between ~/.config/openbox/autostart and /etc/xdg/autostart is a common cause of programs launching twice at startup (e.g. two network manager tray icons).
environment
~/.config/openbox/environment can be used to export and set relevant environmental variables such as to:
Define new pathways (e.g. execute commands that would otherwise require the entire pathway to be listed with them)
Change language settings, and
Define other variables to be used (e.g. the fix for GTK theming could be listed here)
GUI configuration
Several GUI applications are available to quickly and easily configure your Openbox desktop. From the official repositories:
ObConf — A GTK2 based configuration tool for the Openbox window manager.
Programs and applications relating to the configuration of Openbox's desktop menu are discussed in the Menus section.
Openbox reconfiguration
Tip: where not already present, it would be worthwhile adding this command to a menu and/or as a keybind for convenience.
Openbox will not always automatically reflect any changes made to its configuration files within a session. As a consequence, it will be necessary to manually reload those files after they have been edited. To do so, enter the following command:
$ openbox --reconfigure
Where intending to add this command as a keybind to ~/.config/openbox/rc.xml, it will only be necessary to list the command as reconfigure. An example has been provided below, using the Super+F11 keybind:
All keybinds must be added to the ~/.config/openbox/rc.xml file, and below the <!-- Keybindings for running aplications --> heading. Although a brief overview has been provided here, a more in-depth explanation of keybindings can be found at openbox.org. There is a utility 'obkey' in AUR for adjust key-binding. Before use obkey, you should use obconf to create ~/.config/openbox/rc.xml.
Special keys
While the use of standard alpha-numeric keys for keybindings is self-explanatory, special names are assigned to other types of keys, such as modifers, multimedia keys and navigation keys.
Modifiers
Modifer keys play an important role in keybindings (e.g. holding down the shift or CTRL / control key in combination with another key to undertake an action). Using modifers helps to prevent conflicting keybinds, whereby two or more actions are linked to the same key or combination of keys. The syntax to use a modifer with another key is:
"<modifier>-<key>"
The modifer codes are as follows:
S: Shift
C: Control / CTRL
A: Alt
W: Super / Windows
M: Meta
H: Hyper (If it is bound to something)
For example, the code below would use super and t to launch lxterminal
Notes:please use the second argument of the template to provide more detailed indications. (Discuss in Talk:Openbox#)
Where available, it is possible to set the appropriate multimedia keys to perform their intended functions, such as to control the volume and/or the screen brightness. These will usually be integrated into the function keys, and are identified by their appropriate symbols. See Extra keyboard keys for details.
The volume and brightness multimedia codes are as follows (note that commands will still have to be assigned to them to actually function):
XF86AudioRaiseVolume: Increase volume
XF86AudioLowerVolume: Decrease volume
XF86AudioMute: Mute / unmute volume
XF86MonBrightnessUp: Increase screen brightess
XF86MonBrightnessDown: Decrease screen brightness
Examples of how these may be used in ~/.config/openbox/rc.xml have been provided below.
Navigation keys
These are the directional / arrow keys, usually used to move the cursor up, down, left, or right. The (self-explanatory) navigation codes are as follows:
Up: Up
Down: Down
Left: Left
Right: Right
Volume Control
What commands should be used for controlling the volume will depend on whether ALSA, PulseAudio, or OSS is used for sound.
ALSA
If ALSA is used for sound, the amixer program can be used to adjust the volume, which is part of the alsa-utils package. The following example - using the multimedia keys intended to control the volume - will adjust the volume by +/- 5% (which may be changed, as desired):
Where using PulseAudio with ALSA as a backend, the amixer program commands will have to be modifed, as illustrated below in comparison to the ALSA example:
Note: This option may be suitable for more experienced users.
Where using OSS, it is possible to create keybindings to raise or lower specific mixers. This allows, for example, the volume of a specific application (such as an audio player) to be changed without changing the overall system volume settings in turn. In this instance, the application must first have been configured to use its own mixer.
In the following example, MPD has been configured to use its own mixer - also named mpd - to increase and decrease the volume by a single decibel at a time. The -- that appears after the ossmix command has been added to prevent a negative value from being treated as an argument:
The xbacklight program is used to control screen brightness, which is part of the Xorg X-Window system. In the example below, the multimedia keys intended to control the screen brightness will adjust the settings by +/- 10%:
Many desktop environments and window managers support window snapping (e.g. Windows 7 Aero snap), whereby they will automatically snap into place when moved to the edge of the screen. This effect can also be simulated in Openbox through the use of keybinds on focused windows.
As illustrated in the example below, percentages must be used to determine window sizes (see openbox.org for further information). In this instance, The super key is used in conjunction with the navigation keys:
However, it should be noted that once a window has been 'snapped' to an edge, it will remain vertically maximised unless subsequently maximised and then restored. The solution is to implement additional keybinds - in this instance using the down and up keys - to do so. This will also make pulling 'snapped' windows from screen edges faster as well:
This Ubuntu forum thread provides more information. Applications such as opensnap-gitAUR are also available from the AUR to automatically simulate window snapping behaviour without the use of keybinds.
Desktop menu
It is also possible to create a keybind to access the desktop menu. For example, the following code will bring up the menu by pressing CTRL + m:
It is possible to employ three types of menu in Openbox: static, pipes (dynamic), and generators (static or dynamic). They may also be used alone or in any combination.
Static
As the name would suggest, this default type of menu does not change in any way, and may be manually edited and/or (re)generated automatically through the use on an appropriate software package.
Fast and efficient, while this type of menu can be used to select applications, it can also be useful to access specific functions and/or perform specific tasks (e.g. desktop configuration), leaving the access of applications to another process (e.g. the synapse or xfce4-appfinder applications).
The ~/.config/openbox/menu.xml file will be the sole source of static desktop menu content.
menumaker
Warning: A root terminal must be installed in order to use MenuMaker, even though a standard user terminal may be used to run it. xterm is a good choice.
menumaker automatically generates xml menus for several window managers, including Openbox, Fluxbox, IceWM and Xfce. It will search for all installed executable programs and consequently create a menu file for them. It is also possible to configure MenuMaker to exclude certain application types (e.g. relating to GNOME or KDE), if desired.
Once installed and executed, it will automatically generate a new ~/.config/openbox/menu.xml file. To avoid overwriting an existing file, enter:
$ mmaker -v OpenBox3
Otherwise, to overwrite an existing file, add the force argument (f):
$ mmaker -vf OpenBox3
Once a new ~/.config/openbox/menu.xml file has been generated it may then be manually edited, or configured using a GUI menu editor, such as obmenu.
obmenu
Warning: obm-xdg - a pipe menu to generate a list of GTK+ and GNOME applications - is also provided with obmenu. However, it has long-running bugs whereby it may produce an invalid output, or even not function at all. Consequently it has been omitted from discussion.
obmenu is a "user-friendly" GUI application to edit ~/.config/openbox/menu.xml, without the need to code in xml.
xdg-menu
archlinux-xdg-menu will automatically generate a menu based on xdg files contained within the /etc/xdg/ directory for numerous Window Managers, including Openbox. Review the Xdg-menu#OpenBox article for further information.
logout menu options
Tip: The commands provided can also be attached to keybinds.
The ~/.config/openbox/menu.xml file can be edited in order to provide a sub-menu with the same options as provided by oblogout. The sample script below will provide all of these options, with the exception of the ability to lock the screen:
Once the entries have been composed, add the following line to present the sub-menu where desired within the main desktop menu (usually as the last entry):
<menu id="exit-menu"/>
Pipes
Tip: It is entirely feasible for a static menu to contain one or more pipe sub-menus. The functionality of some pipe menus may also rely on the installation of relevant software packages.
This type of menu is in essence a script that provides dynamic, refreshed lists on-the-fly as and when run. These lists may be used for multiple purposes, including to list applications, to provide information, and to provide control functions. Pre-configured pipe menus can be installed, although not from the official repositories. More experienced users can also modify and/or create their own custom scripts. Again, ~/.config/openbox/menu.xml may and commonly will contain several pipe menus.
Examples
openbox-xdgmenuAUR: fast xdg-menu converter to xml-pipe-menu
Openbox.org also provides a further list of pipe menus.
Generators
This type of menu is akin to those provided by the taskbars of desktop environments such as Xfce or LXDE. Automatically updating on-the-fly, this type of menu can be powerful and very convenient. It may also be possible to add custom categories and menu entries; read the documentation for your intended dynamic menu to determine if and how this can be done.
A menu generator will have to be executed from the ~/.config/openbox/menu.xml file.
obmenu-generator
Tip: icons can still be disabled in obmenu-generatorAUR, even where enabled in ~/.config/openbox/rc.xml.
obmenu-generatorAUR is currently only available from the AUR, although it is still highly recommended. With the ability to be used as a static or dynamic menu, it is highly configurable, powerful, and versatile. Menu categories and individual entries may also be easily hidden, customised, and/or added with ease. The official homepage provides further information and screenshots.
Below is an example of how obmenu-generator would be dynamically executed without icons in ~/.config/openbox/menu.xml:
ObmenugenAUR is currently only available from the AUR, and can be used to a generate static or dynamic application menu based on .desktop files. The official homepage provides further information.
Menu icons
To show icons next to menu entries, it will be necessary to ensure they are enabled in the <menu> section of the ~/.config/openbox/rc.xml file:
<applicationIcons>yes</applicationIcons>
Where using a static menu, it will then be necessary to edit the ~/.config/openbox/menu.xml file to provide both the icon = command, along with the full path and icon name for each entry. An example of the syntax used to provide an icon for a category is:
<menu id="apps-menu" label="[label name]" icon="[pathway to icon]/[icon name]">
Desktop menu as a panel menu
Tip: XDoTool can simulate any keybind for any action, and as such, it may therefore be used for many other purposes...
xdotool is a package that can issue commands to simulate key presses / keybinds, meaning that it is possible to use it to invoke keybind-related actions without having to actually press their assigned keys. As this includes the ability to invoke an assigned keybind for the Openbox desktop menu, it is therefore possible to use XDoTool to turn the Openbox desktop menu into a panel menu. Especially where the desktop menu is heavily customised and feature-rich, this may prove very useful to:
Replace an existing panel menu
Implement a panel menu where otherwise not provided or possible (e.g. for tint2-gitAUR)
Compensate where losing access to the desktop menu due to the use of an application like xfdesktop to manage the desktop.
Once XDoTool has been installed - if not already present - it will be necessary to create a keybind to access the root menu in ~/.config/openbox/rc.xml, and again below the <!-- Keybindings for running aplications --> heading. For example, the following code will bring up the menu by pressing CTRL + m:
Openbox must then be re-configured. In this instance, XDoTool will be used to simulate the CTRL + m keypress to access the desktop menu with the following command (note the use of + in place of -):
xdotool key control+m
How this command may be used as a panel launcher / icon is largely dependent on the features of panel used. While some panels will allow the above command to be executed directly in the process of creating a new launcher, others may require the use of an executable script. As an example, a custom executable script called obpanelmenu.sh will be created in the ~/.config folder:
$ text editor ~/.config/obpanelmenu.sh
Once the empty file has been opened, the appropriate XDoTool command must be added to the empty file (i.e. to simulate the CTRL + m keypress for this example):
xdotool key control+m
After the file has been saved and closed, it may then be made into an executable script with the following command:
$ chmod +x ~/.config/obpanelmenu.sh
Executing it will bring up the Openbox desktop menu. Consequently, where using a panel that supports drag-and-drop functionality to add new launchers, simply drag the executable script onto it before changing the icon to suit personal taste. For instructions on how to use this executable script with tint2-svnAUR - a derivative of the popular tint2 panel that allows launchers to be added - see Tint2-Svn launchers.
Desktop theming
Tip: It is strongly advised to install the obconf and lxappearance-obconf GUI applications to configure visual settings and theming. The latter is particularly important as it is responsible for generating the ~/.gtkrc-2.0 file (see GTK+#GTK+ 2.x).
It is important to note that a substantial range of both Openbox-specific and generalised, Openbox-compatibleGTK themes are available to change the look of window decorations and the desktop menu. Generalised themes are designed to be simultaneously compatible with a range of popular desktop environments and/or window managers, commonly including Openbox. See these package descriptions for examples.
A good selection of openbox-themes are available from the official repositories.
Both Openbox-specific and Openbox-compatible themes installed from the official repositories and/or the AUR will be automatically installed to the /usr/share/themes directory. Both will also be immediately available for selection.
Installation: other sources
box-look.org is an excellent and well-established source of themes. deviantART.com is another excellent resource. Many more can be found through the utilisation of a search engine.
Troubleshooting
There are two particular problems that may be encountered on rare occasions, especially where downloading themes from unsupported websites. These have been addressed below.
Theme cannot be used
If for any reason the newly extracted theme cannot be selected, open the theme directory to first ensure that it is indeed compatible with Openbox by determining that an openbox-3 directory is present, and that within this directory a themerc file is also present. An .obt (OpenBox Theme) file may also be present in some instances, which can then be manually loaded in obconf.
Where expected files and directories are present and correct, then on occasion it is possible that the theme author has not correctly set permission to access the file (e.g. permission may still be for the account of the author, rather than for root). To eliminate this possibility, ensure the folder and file permissions are for root:
# chown -R root /user/share/themes
Theme looks broken
Of course, the first line of enquiry would be to check that it is not just a badly made, broken theme! Otherwise, ensure that the Openbox GTK fix[dead link 2014-11-28] has been implemented, and then re-start the session. Unfortunately some older themes can simply break if not maintained sufficiently to keep pace with the changes incurred by GTK updates. To avoid such occurrences, it is best to check that desired themes have recently been created or at least updated / patched.
Edit or create new themes
Tip: Where deciding to modify an existing theme (e.g. the colour scheme), it would be best to work on a copy of it, rather than the original. This will retain the original should anything go wrong, and ensure that your changes are not over-written through an update.
The process of creating new or modifying existing themes is covered extensively at the official openbox.org website. A user-friendly GUI to do so - obthemeAUR - is also available from the AUR.
Compositing effects
Openbox does not provide native support for compositing, and thus requires an external compositor for this purpose.
Although compositing is not a necessary component, it may specifically avoid issues such as screen distortion with oblogout, and visual glitches with terminal window transparency. See Xorg#Composite for common choices.
Openbox does not natively support the use of desktop icons or wallpapers. As a consequence, it will be necessary to install additional applications for this purpose, where desired.
Desktop management using file managers
Some file managers have the capacity to fully manage the desktop, meaning that they may be used to provide wallpapers and enable the use of icons on the desktop. The LXDE desktop environment itself uses PCManFM for this purpose.
While there are programs dedicated to enabling desktop icons alone, it would seem that they have greater drawbacks than the utilisation of file managers for the task. These programs are discussed briefly, below.
idesk
idesk is a simple program that can enable icons in addition to managing wallpaper. It will be necessary to create an ~/.idesktop directory, and desktop icons must also be manually created. To use idesk to provide icons, add the following command to the ~/.config/openbox/autostart file:
idesk &
xfdesktop
xfdesktop is the desktop manager for Xfce. The Thunar file manager will also be downloaded as a dependency. Where this is used, the Openbox desktop menu will no longer be accessible by right-clicking the background.
As such, it will consequently be necessary to access it by other means, such as by creating a keybind, and/or by - where permitted - re-configuring an installed panel to use the desktop menu as a panel menu. To use xfdesktop to provide icons, add the following command to the ~/.config/openbox/autostart file:
xfdesktop &
conky reconfiguration
Particularly where using a file manager to manage the desktop, it will be necessary to edit ~/.conkyrc to change the own_window_type command in order for conky to continue to be displayed (where used). The revised command that should be used is:
own_window_type normal
oblogout
See the Oblogout article for an overview on how to use this useful, graphical logout script.
Openbox for multihead users
While Openbox provides better than average multihead support on its own, the openbox-multihead-gitAUR package from the AUR provides a development branch called Openbox Multihead that gives multihead users per-monitor desktops. This model is not commonly found in floating window managers, but exists mainly in tiling window managers. It is explained well on the Xmonad web site. Also, please see README.MULTIHEAD for a more comprehensive description of the new features and configuration options found in Openbox Multihead.
Openbox Multihead will function like normal Openbox when only a single head is available.
A downside to using Openbox Multihead is that it breaks the EWMH assumption that one and only one desktop is visible at any time. Thus, existing pagers will not work well with it. To remedy this, pager-multihead-gitAUR can be found in the AUR and is compatible with Openbox Multihead.Screenshots.
Finally, a new version of PyTyle that will work with Openbox Multihead can also be found in the AUR: pytyle3-gitAUR.
Both pytyle3 and pager-multihead-git will work without Openbox Multihead if only one monitor is active.
Tips and tricks
Switch desktops using the mouse
It is possible to switch desktop by moving the mouse cursor to the edges of the screen. First install xdotool and add the following two lines to your ~/.xinitrc:
xdotool behave_screen_edge --delay 500 left set_desktop --relative -- -1 &
xdotool behave_screen_edge --delay 500 right set_desktop --relative -- +1 &
By default Openbox switches from the last desktop back to the first desktop on mouse wheel scroll. Use <wrap>no</wrap> in the mousebind section to disable this behaviour.
Warning: This may not work where other actions are defined within the action group.
The program transset-df is available in the official repositories, and can enable window transparency on-the-fly.
For example, using the following code in the <mouse> section of the ~/.config/openbox/rc.xml file will enable control of application window transparency by hovering the mouse-pointer over the title bar and scrolling with the middle button:
The openbox package provides a obxprop binary that can parse relevant values for applications settings in rc.xml. Officially obxprop | grep "^_OB_APP" is recommended for this task. Start the process by running the command shown, then click a window to see its properties in the terminal.
Doing so for multiple applications and its windows can be very inefficient however. The following script obxprop2obrc makes it much easier to configure even a large number of applications.
The factual accuracy of this article or section is disputed.
#!/bin/bash
##Script: obxprop-to-openbox-rc.sh
##Recommended executable name: obxprop2obrc

while [ $# -ne 0 ]; do
case $1 in
    -f*)
        shift;
        FILE="$1";
 shift;
    ;;
    -t*)
        shift;
        TIME="$1";
 shift;
    ;;
    *)
        echo Usage: $0 [-f FILE_TEMPLATE] [-t WAIT_TO_KILL_TIME]
        exit 1;
    ;;
esac
done

if [ $TIME ]; then
    OBXPROPS=( $(obxprop | cat & (sleep $TIME && pkill -13 cat) | awk -F \" '/_OB_APP/{ print "\x22"$2"\x22" }' ) );
else
    OBXPROPS=( $(obxprop | awk -F \" '/_OB_APP/{ print "\x22"$2"\x22" }' ) );
fi
OBPROPS=(TYPE TITLE GROUP_CLASS GROUP_NAME CLASS NAME ROLE);
j=0;
for i in $( seq 2 2 14 ); do
    OBPROP="$( echo ${OBXPROPS[@]} | awk -F \" '{ print $'$i'}' )";
    if [[ -z $OBPROP ]]; then
        declare ${OBPROPS[$j]}='"*"';
    else
        declare ${OBPROPS[$j]}="\"$OBPROP\"";
    fi
    j=$(($j+1));
done;

echo "    <application type="$TYPE" title="$TITLE" class="$CLASS" name="$NAME" role="$ROLE">"
if [ -f "$FILE"  ]; then cat "$FILE" && exit; fi
cat << EOF
      <desktop>1</desktop>
      <desktop>all</desktop>
      <decor>yes</decor>
      <decor>no</decor>
      <focus>yes</focus>
      <focus>no</focus>
      <fullscreen>yes</fullscreen>
      <fullscreen>no</fullscreen>
      <iconic>yes</iconic>
      <iconic>no</iconic>
      <maximized>yes</maximized>
      <maximized>no</maximized>
      <maximized>both</maximized>
      <maximized>horizontal</maximized>
      <maximized>vertical</maximized>
      <monitor>0</monitor>
      <monitor>1</monitor>
      <position force="no">
      <position force="yes">
        <width>40%</width>
        <height>30%</height>
        <x>-1</x>
        <y>-1</y>
        <x>center</x>
        <y>center</y>
      </position>
      <layer>above</layer>
      <layer>normal</layer>
      <layer>below</layer>
      <shade>yes</shade>
      <shade>no</shade>
      <skip_pager>yes</skip_pager>
      <skip_pager>no</skip_pager>
      <skip_taskbar>yes</skip_taskbar>
      <skip_taskbar>no</skip_taskbar>
    </application>
EOF
If no further options are used default configuration, that can be edited by deleting unnecessary lines, is printed out. This script can use templates with default values when using -f switch:
It also has a time switch -t which kills obxprop and thus can reduce time significantly in certain situations, although it may not work perfectly.
Xprop values for applications
xorg-xprop is available in the official repositories, and can be used to relay property values for selected applications. Where frequently using per-application settings, the following Bash Alias may be useful: dy:
To use Xorg-XProp, run using the alias given xp, and click on the active program desired to define with per-application settins. The results displayed will only be the information that Openbox itself requires, namely the WM_WINDOW_ROLE and WM_CLASS (name and class) values:
For whatever reason, Firefox and like-minded equivalents ignore application rules (e.g. <desktop>) unless class="Firefox*" is used. This applies irrespective of whatever values xprop may report for the program's WM_CLASS.
Install obsetlayoutAUR. To set a 2x2 grid for example:
obsetlayout 0 2 2 0
Run it without arguments to know what the arguments mean.
Troubleshooting
Windows load behind the active window
Some application windows (such as Firefox windows) may load behind the currently active window, causing you to need to switch to the window you just created to focus it. To fix this behavior add this to your ~/.config/openbox/rc.xml file, inbetween the <openbox_config> and </openbox_config>tags: